Eco Easter Egg Dyes: Zero‑Waste Natural Recipes

Ever wondered how to get those vivid Easter egg colors without a single drop of synthetic dye? I’ve been turning kitchen scraps into brilliant hues for years on the road, and it’s the perfect way to celebrate a holiday that’s all about renewal while keeping your waste footprint at zero. In this guide I’ll walk you through step‑by‑step recipes, safety tips, and clever ways to reuse every leftover, so your spring celebration stays colorful and sustainable.
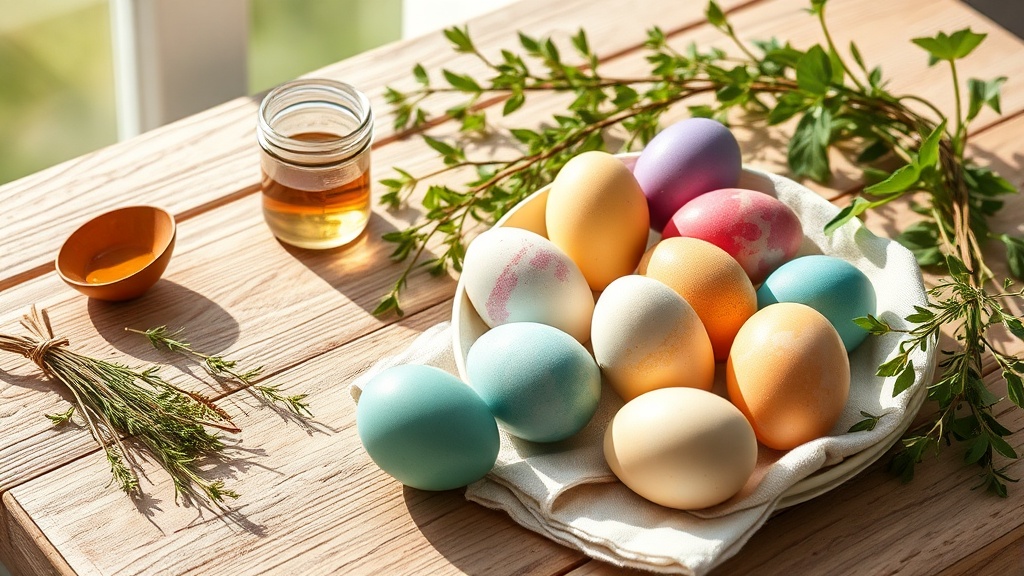
What kitchen scraps can I use for natural egg dyes?
Nature offers a palette right in your pantry. Here are my go‑to ingredients:
- Onion skins – warm oranges and rust reds. University of Minnesota Extension
- Beet tops and skins – deep pinks and magentas. Nature study on beet pigments
- Turmeric powder or fresh turmeric root – sunny yellows. Healthline on turmeric
- Red cabbage leaves – blues and purples when you add a splash of vinegar. Scientific American guide
- Spinach or kale stems – gentle greens.
All you need is a compact kitchen set‑up that fits in a van or trailer, plus a pot, water, and a splash of white vinegar to fix the color.
How do I prepare the dye baths safely?
Follow these steps for consistent, safe results:
- Gather your scrap material (about 1 cup per 12 eggs) and place it in a saucepan.
- Add enough water to cover the scraps, then bring to a simmer for 15‑20 minutes.
- Strain the liquid into a clean bowl; the color deepens as it cools.
- Add 1‑2 teaspoons of white vinegar per cup of dye – this helps the pigment bond to the shell.
- Cool the dye to room temperature before submerging hard‑boiled eggs (they should be completely peeled).
For a deeper hue, let the eggs sit in the dye for 10‑30 minutes, checking the color frequently. The process is kid‑friendly, but always supervise the simmering step.
Which colors can I achieve and how?
Here’s a quick cheat‑sheet of scrap‑to‑color combos:
| Scrap | Resulting Color | Tip |
|---|---|---|
| Onion skins | Rust orange | Add a pinch of turmeric for extra brightness. |
| Beet tops | Pink/magenta | Use less vinegar for a softer hue. |
| Turmeric | Sunny yellow | Combine with a drop of lemon juice to mute bitterness. |
| Red cabbage + vinegar | Blue to purple | Adjust pH: more vinegar = bluer, less = greener. |
| Spinach/kale | Soft green | Blend with a tiny bit of beet for an olive tone. |
If you want a rainbow, simply rotate the eggs through multiple dye baths.
How can I reuse decorations and stay zero‑waste?
After the eggs are dyed, think beyond the basket:
- Egg shells as seed starters – gently crack the top, fill with soil, and sprinkle seeds. The shell provides calcium for seedlings.
- Reusable egg holders – repurpose a wooden egg carton or a fabric mesh bag you already have for camping trips.
- Compostable packaging – wrap your dyed eggs in a cloth napkin or a biodegradable parchment made from plant fibers.
These tricks keep the celebration circular, mirroring the ethos of van‑life maintenance where every item gets a second life.
What are the composting tips for leftover dye material?
All the plant matter you’ve simmered can return to the earth:
- Cool the leftover broth.
- Mix the solids with kitchen compost (scraps, coffee grounds, eggshells).
- If you’re camping, bury the mixture in a shallow pit away from water sources – it will break down in a few weeks.
Keep the compost moist but not soggy; the natural pigments will enrich the soil without harming microbes.
Takeaway
By turning everyday kitchen scraps into vibrant Easter egg dyes, you not only create a beautiful, non‑toxic holiday tradition but also close the loop on waste. The process is simple, kid‑friendly, and fits perfectly into a van‑life kitchen or a backyard garden. Grab those onion skins, fire up a pot, and let the spring colors bloom – sustainably.
Related Reading
- Van Life Kitchen Essentials: Top 7 Compact Gear Picks for 2026 – gear that makes kitchen chemistry on the road a breeze.
- Budget Spring Camping Near Cities – plan a low‑impact Easter weekend road trip.
- Free Camping in the Pacific Northwest – discover pristine spots to showcase your egg‑decorating skills.